So you've got a Valheim server with us, welcome. This guide takes you from "I just bought this" to "my friends are connected and we're playing", which is about ten minutes of work if nothing goes sideways.
Finding your server in the panel
After you order, you'll get an email with your account details. Head to panel.low.ms and log in. Your Valheim server is listed under My Servers, so click into it.
The strip at the top of the server page carries the connection address, shown as the IP and port together, with a copy button next to it. Keep that page open. You'll need the address in a minute, and everything else in this guide lives behind one of the tabs along the top.
Your first settings: name, password and world
Open the Manage tab. The first group in the left-hand rail is General, and it holds the settings worth getting right before the first start.
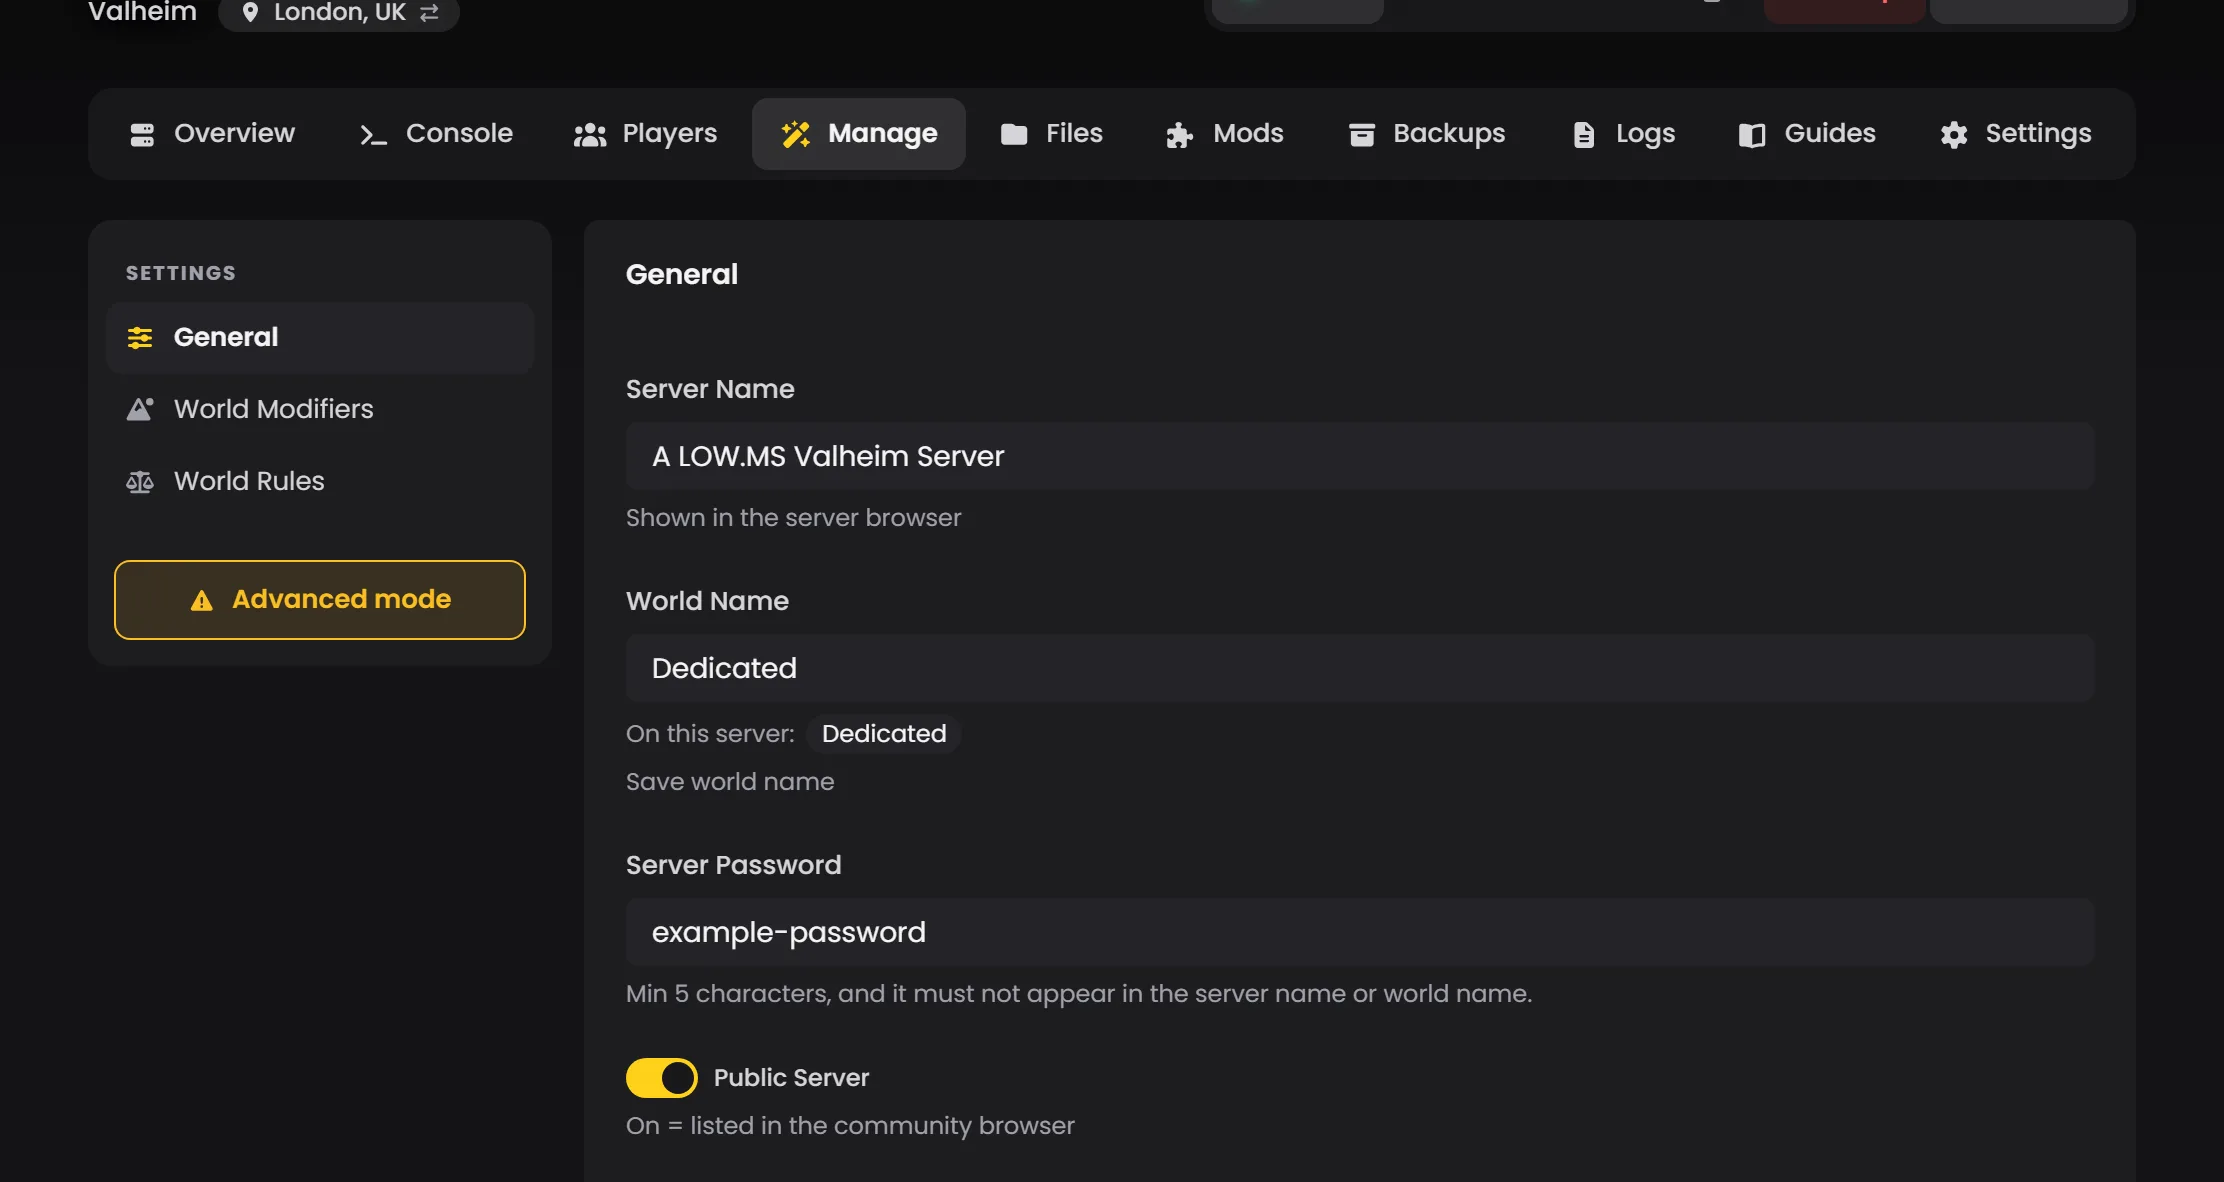
- Server Name is what shows up in the in-game browser.
- Server Password needs at least 5 characters. There's one real gotcha: the password cannot appear inside your world name or your seed. Call your world Midgard and set the password to
gardand the server refuses to start. It does say so, but only in the log, so if a start fails this is the first thing to check. - World Name picks which save is loaded. The field suggests the worlds your server has, and if you type a name that isn't one of them it tells you so: no world by that name exists yet, and starting the server will create a new one. Valheim generates a brand new empty world for any name it doesn't recognise, without complaining anywhere, so a mistyped name and a lost save look identical from the inside. One catch since 1.0: worlds are now saved as folders, and the field doesn't recognise those yet (a fix is on the way), so on a 1.0 world the suggestions can miss it and the notice can appear even when the world is there. Check the Files tab for a folder with that name in
config/valheim/worlds_local/rather than trusting the notice. - Public Server decides whether you're listed in the community browser. Off is still joinable by address.
- Crossplay is a checkbox, off by default. Leave it off unless you have Xbox, PlayStation 5, Switch 2 or Game Pass players, because with it on everyone (Steam players included) connects through Valheim's relay, which can add a little latency. More on this below.
Hit Save, then start the server from the power controls at the top of the page. The first start takes a minute or two while Valheim generates or loads the world, so don't try to connect straight away.
If you want to watch it come up, the Console tab shows the server's output live. The line you're waiting for is Game server connected. Once that's printed, the server is joinable.
Getting your friends connected
There are a few ways in. Pick whichever suits your group.
Direct connect through Steam is the most reliable. In Steam, click View, then Servers, then the Favorites tab, then Add a Server. One thing to know here: Valheim's server browser answers on the port one above your game port. If the panel shows :27515, enter :27516 in Steam. Add it, double-click to join, enter your password.
The in-game browser works too. Launch Valheim, pick your character, Start Game, Join Game, then find your server under the Community tab or use Add Server with the address from the panel. A newly started server can take five or ten minutes to appear in the community list, so use direct connect if you're impatient.
Steam friends is easiest once somebody is already in: right-click their name in your friends list and pick Join Game.
Console and Game Pass players (Xbox, PlayStation 5 and Switch 2 since 1.0) join with a six-digit join code. Xbox and Game Pass players can't join by address at all. Tick Crossplay on the Manage tab, save and restart, and once the server is up the Join your server card on the Overview tab shows the code (or search the Console for "join code"). Console players type it in from the Join Game screen. Steam players carry on with the IP and port, so don't take the address away from them. The code changes every restart, so check it again.
Making yourself an admin
This is quicker than it used to be. Open the Players tab and add yourself to Admins. The same screen carries your Banned list and your Whitelist, so it's one place for all three rather than three separate files.
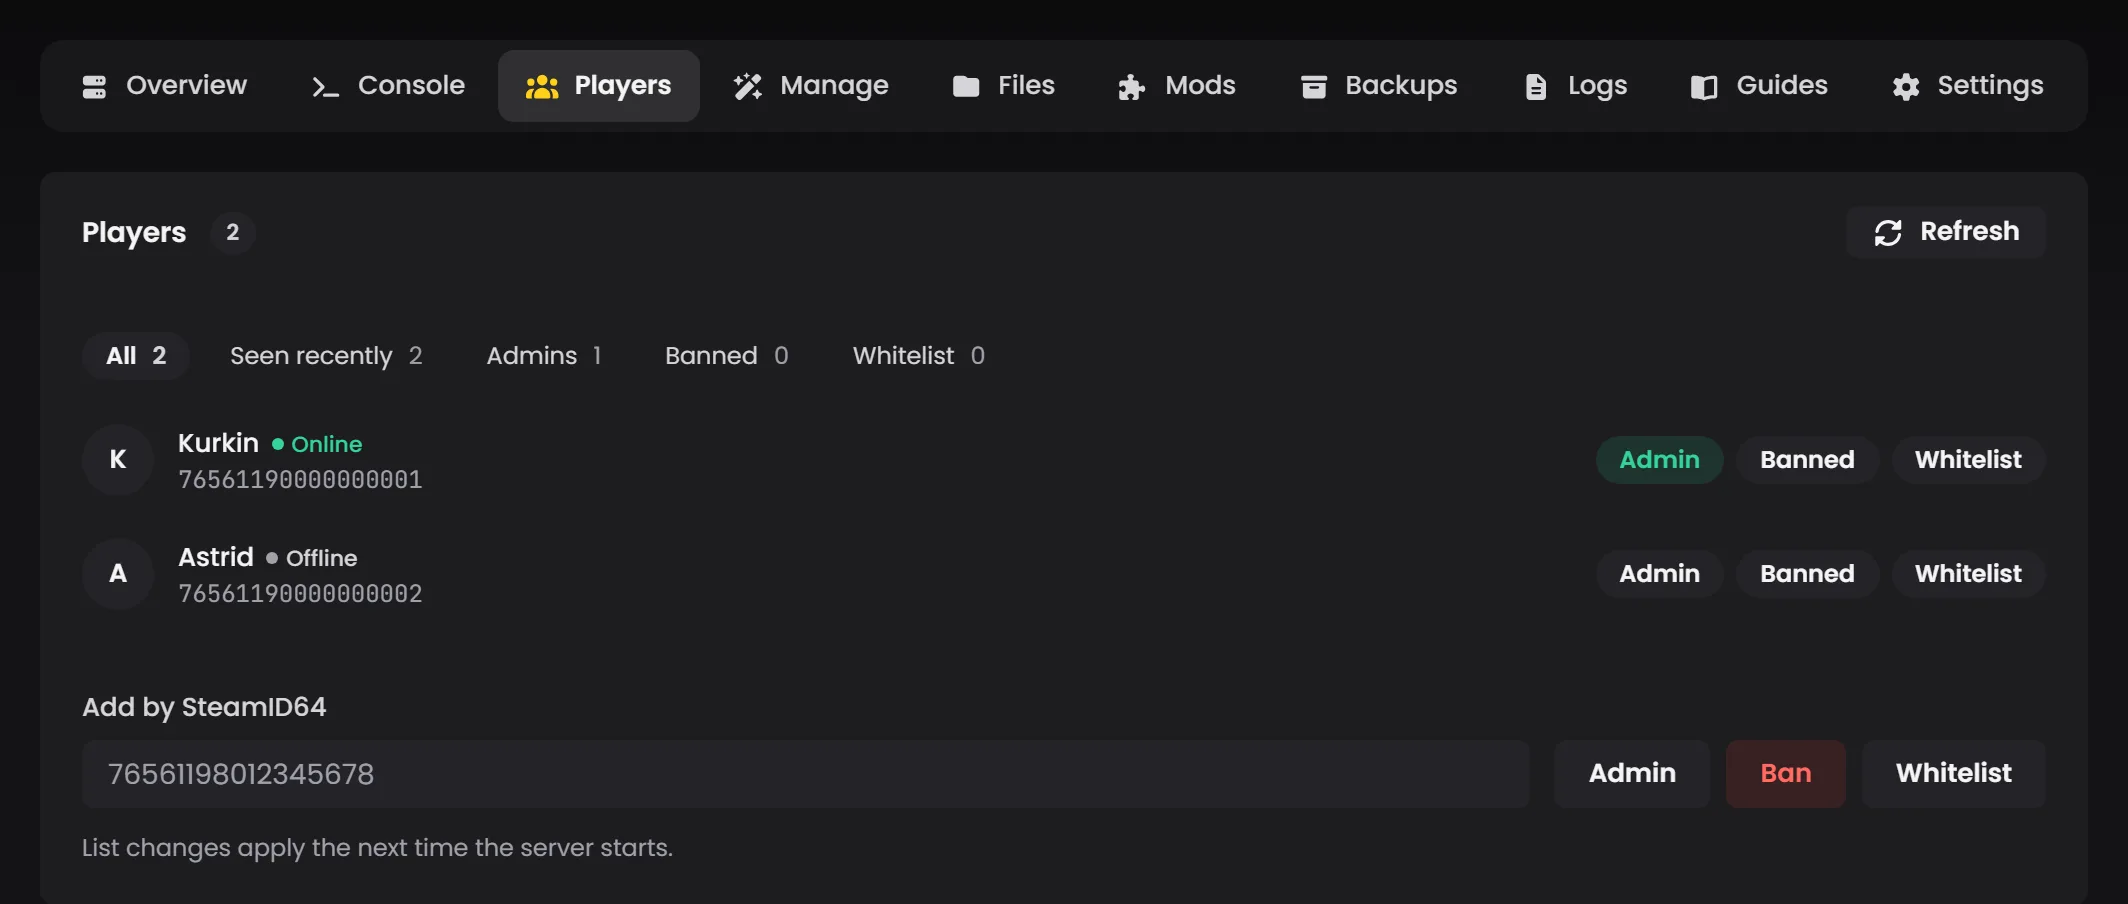
You'll need your Steam64 ID. Look it up at steamid.io, or once you've joined the server yourself, read it straight off your row on the Players tab. If you've never connected, the "Add by SteamID64" field below the roster is how you get onto the list ahead of time.
One line worth reading twice: list changes apply the next time the server starts, not immediately. Add yourself as an admin and you won't have admin powers in the running game until you restart.
Once you're in as an admin, press F5 in-game to open the console. If F5 does nothing, turn the developer console on in Valheim's settings menu, or add -console to its launch options in Steam.
Be aware that "works on a dedicated server" isn't one category. Valheim's devcommands set, so god mode, fly, spawn and the rest, is deliberately switched off on dedicated servers. Of what's left, commands that travel to the server work fine from an admin's client, kick, ban and save among them. Others only ever run on the machine hosting the world, so from a client they do nothing at all despite looking like ordinary admin commands.
Bringing a world across from your PC
If you've been playing locally and want that world on your server, you can. Valheim 1.0 changed how worlds are saved, so check which kind you've got first.
- On your PC, press Win+R and enter
%appdata%, then go up one folder into AppData and down intoLocalLow\IronGate\Valheim\worlds_local. - Find your world. If you've played it on 1.0, it's a folder with the world's name, and the whole folder is what you upload. If you haven't opened it since before 1.0, it's two files,
YourWorldName.dbandYourWorldName.fwl, and you need both (the server converts them to the new format on its first start). - Stop your server from the panel.
- Open the Files tab and go into
config/valheim/worlds_local/. Use Upload folder for a 1.0 world, or Upload for the two files. Watch that path: worlds sit insideconfig/valheim, not at the top level of the file manager. There is aconfig/valheim/worlds/folder too, which is where Valheim keeps older server-created worlds. Yours goes inworlds_local, the same folder name your PC uses. - Go back to Manage and type the world's name into World Name, exactly as it appears on the folder or files.
- Start the server.
The save location guide has the full version, including big worlds that go over the upload limit and what to do if the server already has a world by that name.
What I'd do next
Once everyone can connect, these are worth doing in roughly this order.
Set your world modifiers. They're in the Manage tab under their own group: combat difficulty, death penalty, resource drops, raids and portals, plus a World Preset that sets them all at once. A warning on the World Rules group (Free Building, Player-Triggered Events, Passive Creatures, No Map, Fire Hazard and No Portals): Valheim writes those into the world save itself, so once a world has been started with one of them on, turning it off in the panel won't turn it off in the world. Decide those before you commit to a world you care about.
Decide on mods early. The Mods tab handles installation, and BepInEx is set up for you, so an installed pack loads without any manual configuration. Adding mods to an established world is fine in general, but mods that change world generation or items are much happier on a fresh world. Since 1.0, check a mod has a 1.0 build on Thunderstore before you count on it.
Take a backup before you experiment. The Backups tab is one click, and it's a lot less annoying than rebuilding a base. Valheim keeps its own rolling backups next to the world too (the Saves & Backups group on the Manage tab controls how many), but those live on the server and won't save you from a bad restore or a world you've overwritten yourself.
If something isn't working, the usual culprits are a typo in the address, the wrong password, a start that hasn't finished yet, a password that clashes with the world name, or a server that needs the latest Valheim update (the Game updates card on the Overview tab). Check those first.
And open a ticket from the panel if you're stuck. We'd rather help you in the first hour than have you bounce off something you can't see.